
Easy And Simple Instant Pot Greek Yogurt Recipe


Making simple homemade yogurt in an instant pot is one of the easiest ways to add budget friendly probiotics into your family’s diet. Follow these step by step instructions to make a gallon of thick and creamy Greek yogurt.
As a family of nine, we can easily go through about a gallon of yogurt a week. Aside from eating a cup of yogurt with most of our lunches, we add it to so many recipes! Parfaits, smoothies, baked oatmeal, overnight oats, fruit dip or in place of sour cream sometimes.
You have to try using homemade yogurt in my kids’ favorite healthy fudgesicle recipe!
If we were buying a gallon of yogurt from the store each week, we’d easily be spending $20 on it. That’s just not going to work with our budget!
Making homemade yogurt in the instant pot has been a game changer for our family. We can enjoy as much gut healthy yogurt as we want for a fraction of the cost of store-bought Greek yogurt. And it only takes a few minutes of hands on prep!
So, if you’ve been wondering whether or not an instant pot is worth buying, I say it definitely is! Even if you just used it for making yogurt, you could save hundreds of dollars a year switching to homemade.
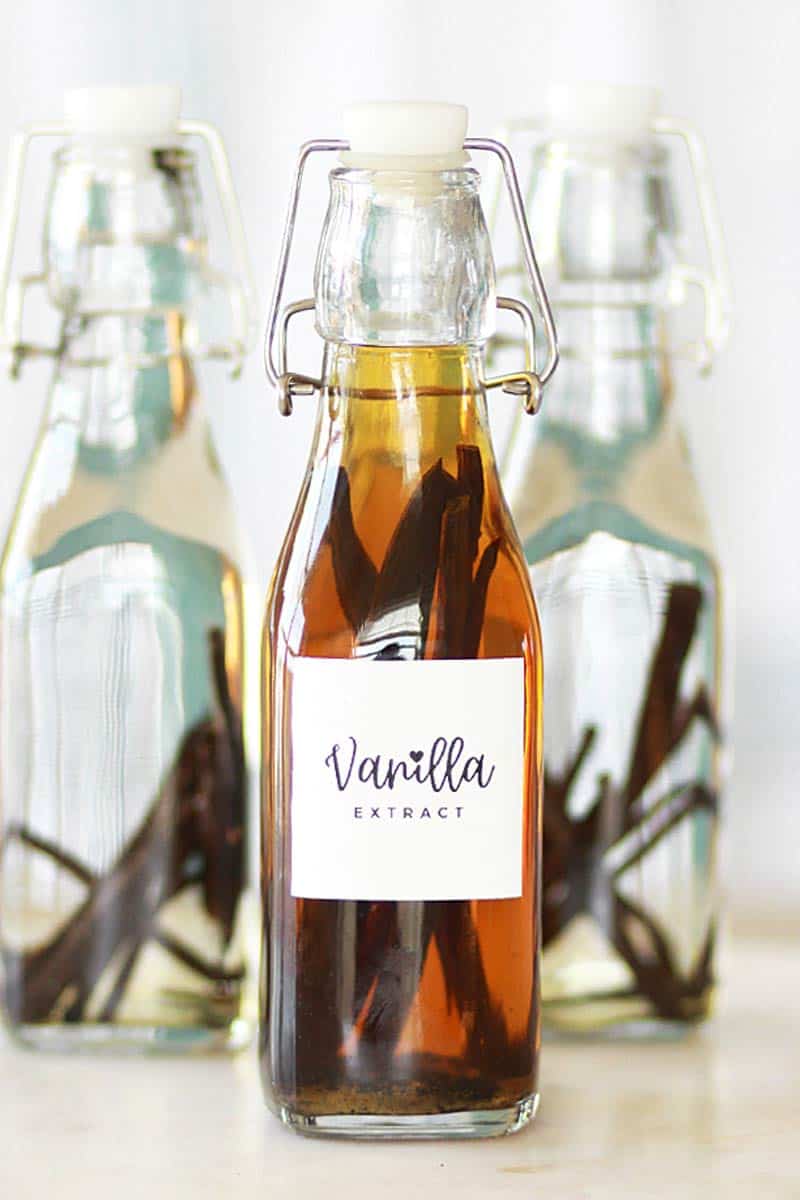
My favorite way to enjoy yogurt is to sweeten it with maple syrup, top it with frozen berries and chunky homemade granola. So, so good.
This post contains affiliate links, which means I make a small commission at no extra cost to you. Get my full disclosure here.
What you need to make simple instant pot yogurt
Ingredients
- Milk – while you can use any cow’s or even goat’s milk to make yogurt, whole milk will give you the thickest and creamiest result. Using low fat milk does work, just not as well. Scroll down to read about using raw milk for instant pot yogurt.
- Starter – yogurt starter contains the live cultures that will multiply and turn the milk into yogurt. I use a 1/2 cup of plain (or vanilla) Greek yogurt as my starter. Make sure the yogurt you use contains “live and active cultures”. Chobani and Fage are good choices.
supplies
- Instant Pot – For this recipe, make sure your instant pot has a yogurt function button.
- Thermometer – It’s important to use a thermometer when you heat up the milk to make sure it isn’t overheated, killing the bacteria needed to make yogurt.
- Whisk – To mix the starter into the milk.
- Colander – For a thicker yogurt that is the consistency of Greek yogurt, it needs to be strained.
- Coffee Filters – I’ve tried a variety of methods for straining yogurt, and I’ve had the best success lining a colander with coffee filters. You can use cheesecloth if you’d rather.
How To Make Simple Instant Pot Yogurt
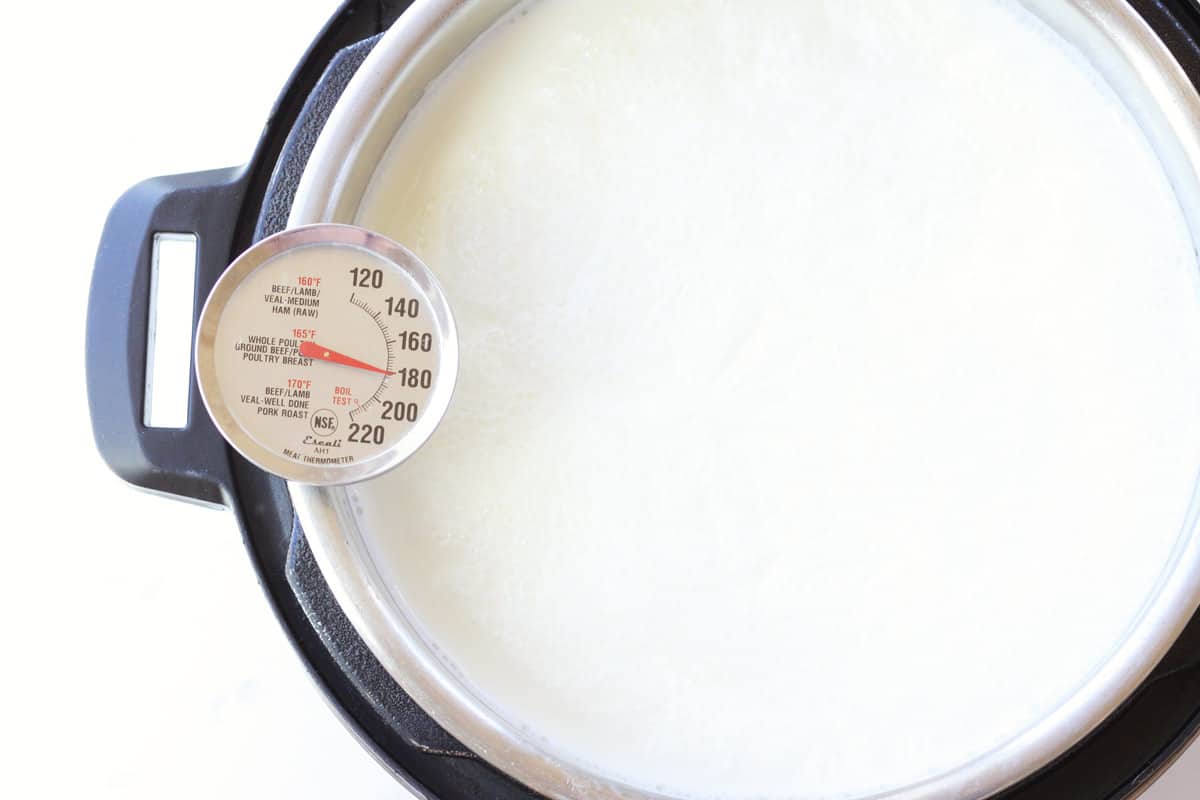
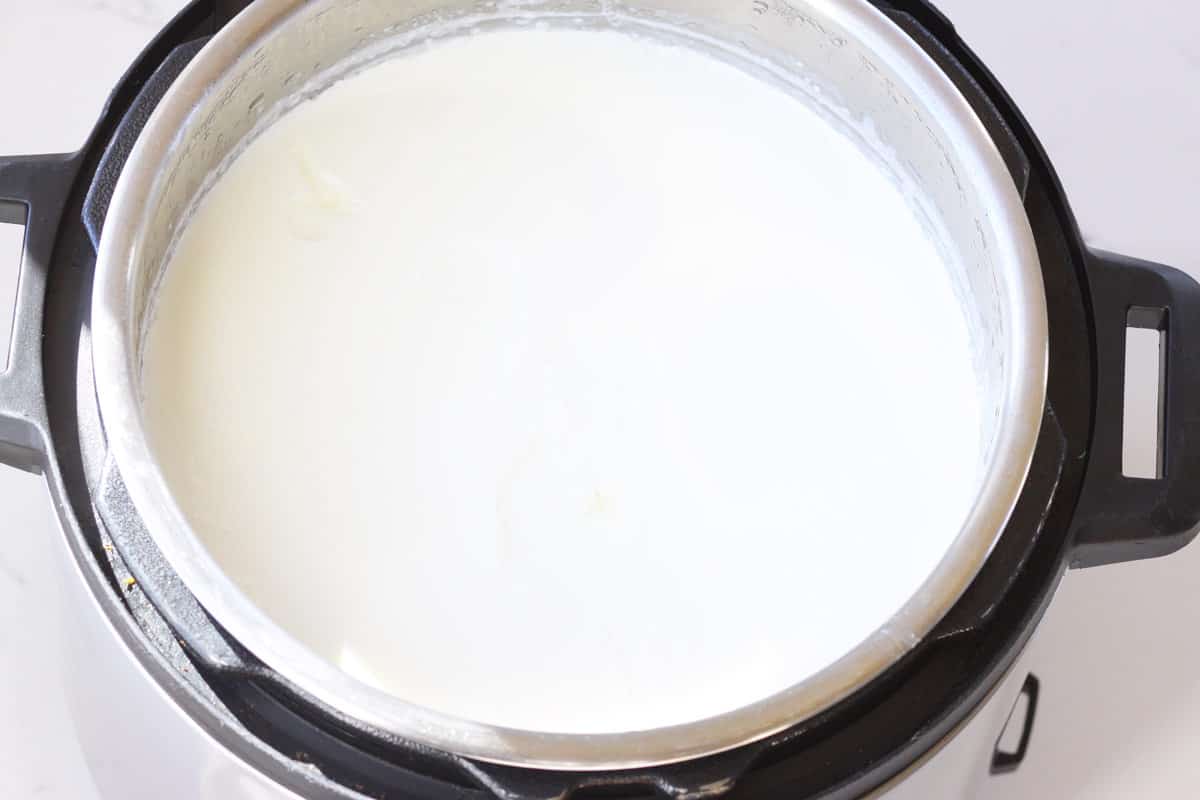
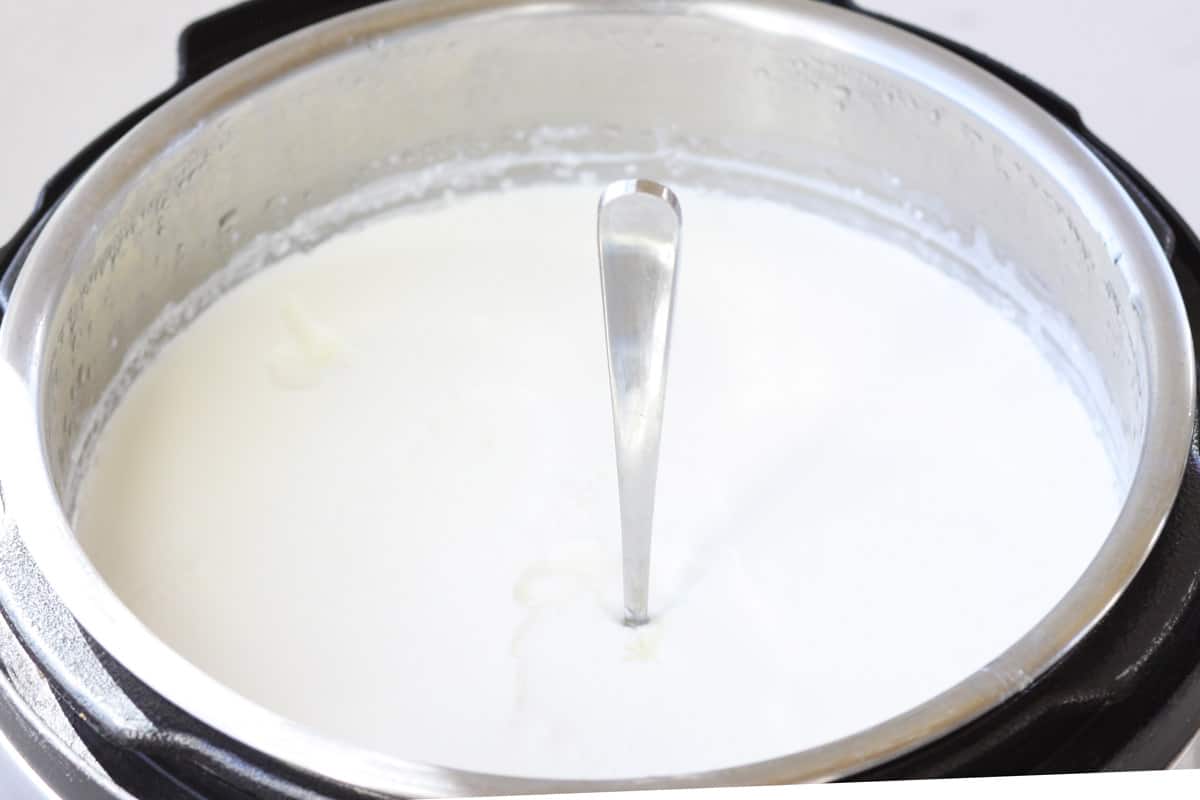
Prep – Make sure your instant pot smells clean and free of any smells from the last thing you made in it. Mine can smell like onions sometimes, so I always double check to make sure I won’t be making onion flavored yogurt! Pour milk into the inner pot of your instant pot and hook a thermometer onto the edge of the pot.
Heat the Milk – Press the “Sauté” button and let the milk heat until it reaches 180 degrees. Heating the milk kills bacteria that will keep it milk from turning into yogurt.
Did you know you can make yogurt without heating the milk? Read more about the cold start method in this post.
Cool – Remove the inner pot of the instant pot and let it sit on the counter until the milk has cooled down to room temperature or about 110 degrees. (this step can take a few hours)
Add the Starter – Set the inner pot back into the instant pot and pour in your yogurt culture. Lightly whisk the milk and starter together.

Use the Yogurt Setting – Remove the rubber gasket from the instant pot lid (to keep any other flavors from affecting the yogurt) and set the lid onto the instant pot. (you could just cover it with plastic wrap instead) No need to make sure it locks.
Press the yogurt button on the instant pot. Using the arrow buttons, set the time to 9 hours.
When the 9 hours are up and the instant pot beeps, remove the inner lining of the instant pot.
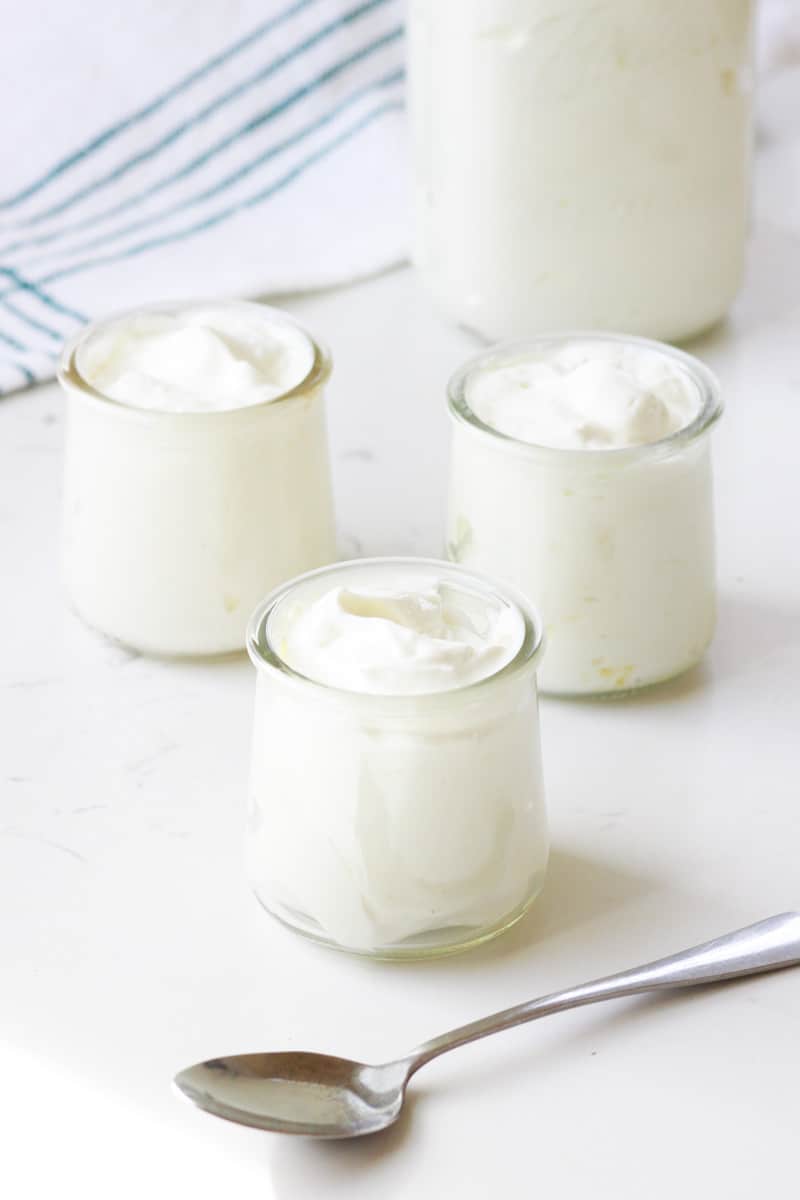
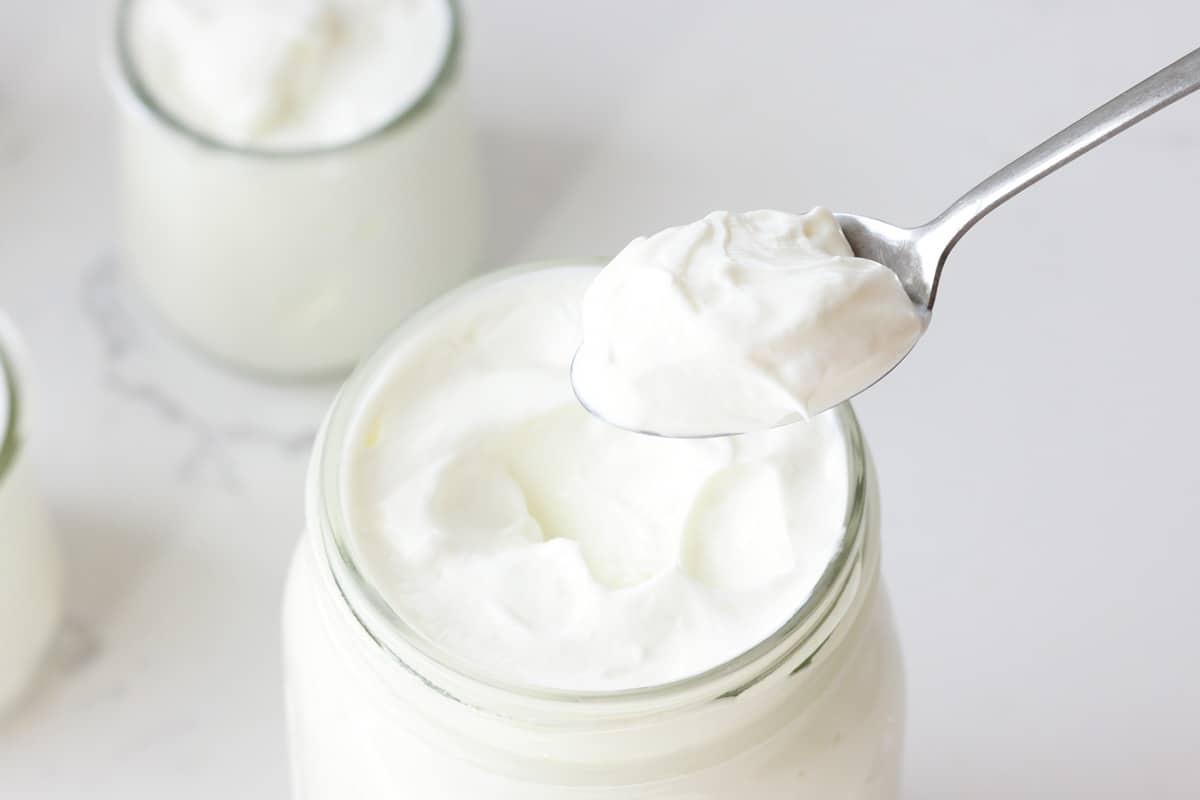
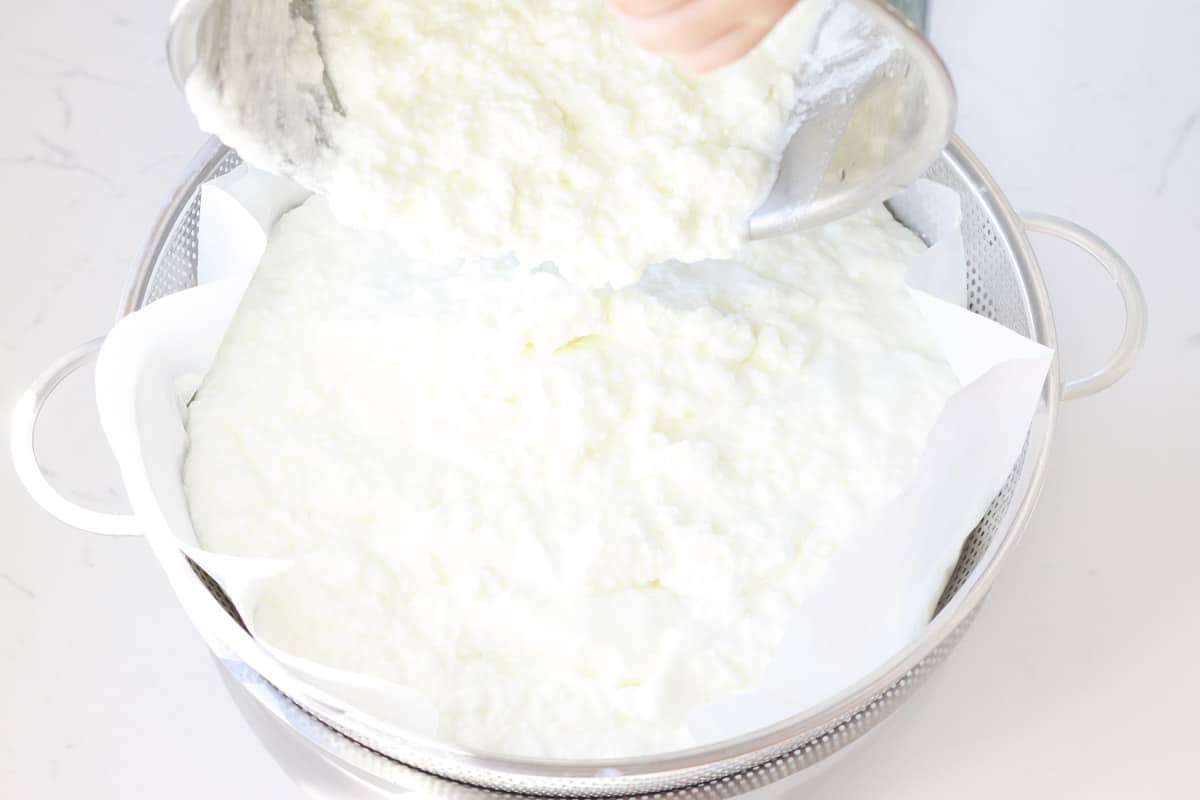
Strain the Yogurt – Set a large colander/strainer over a large bowl. Line the colander with coffee filters or cheesecloth. Pour all of the yogurt into the colander and let most of the excess liquid (whey) strain out so that your yogurt is nice and thick.
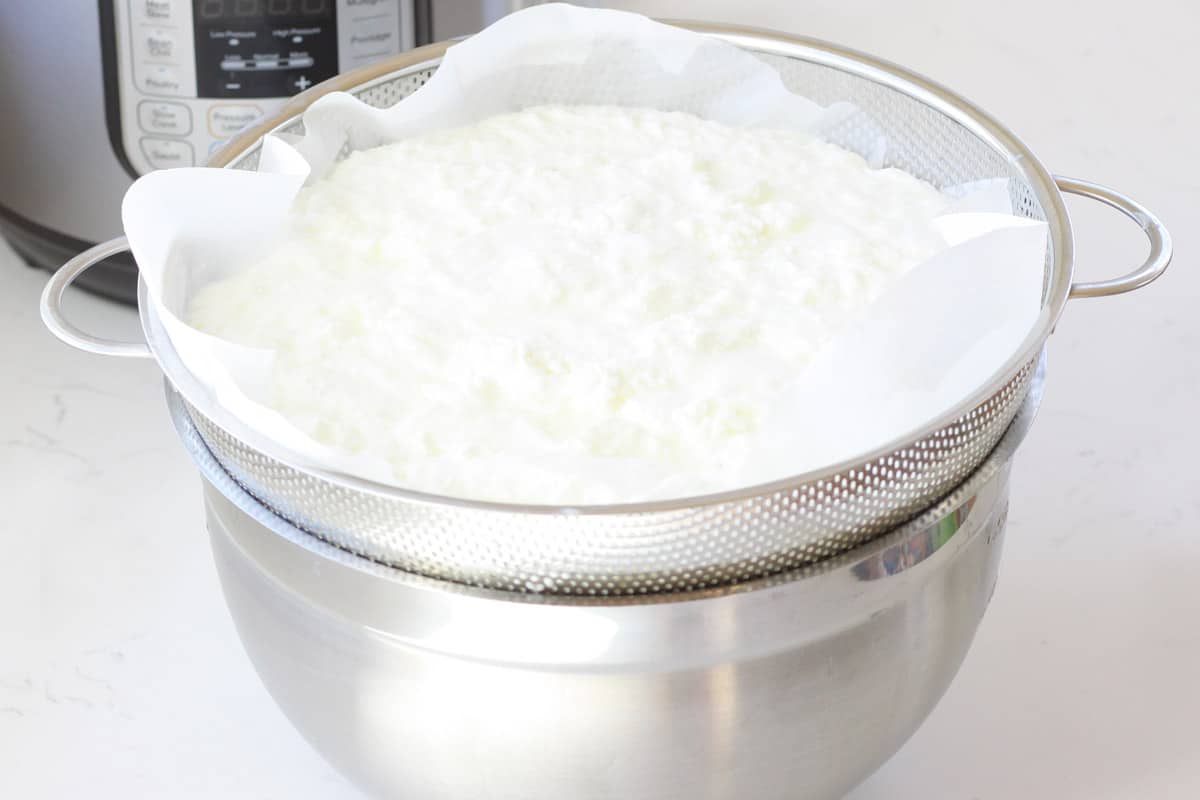
This process can take awhile so it’s best to set the colander and bowl in the fridge. Let the yogurt strain for 12-24 hours until the consistency isn’t runny anymore and it’s looking almost as thick as sour cream or cream cheese.
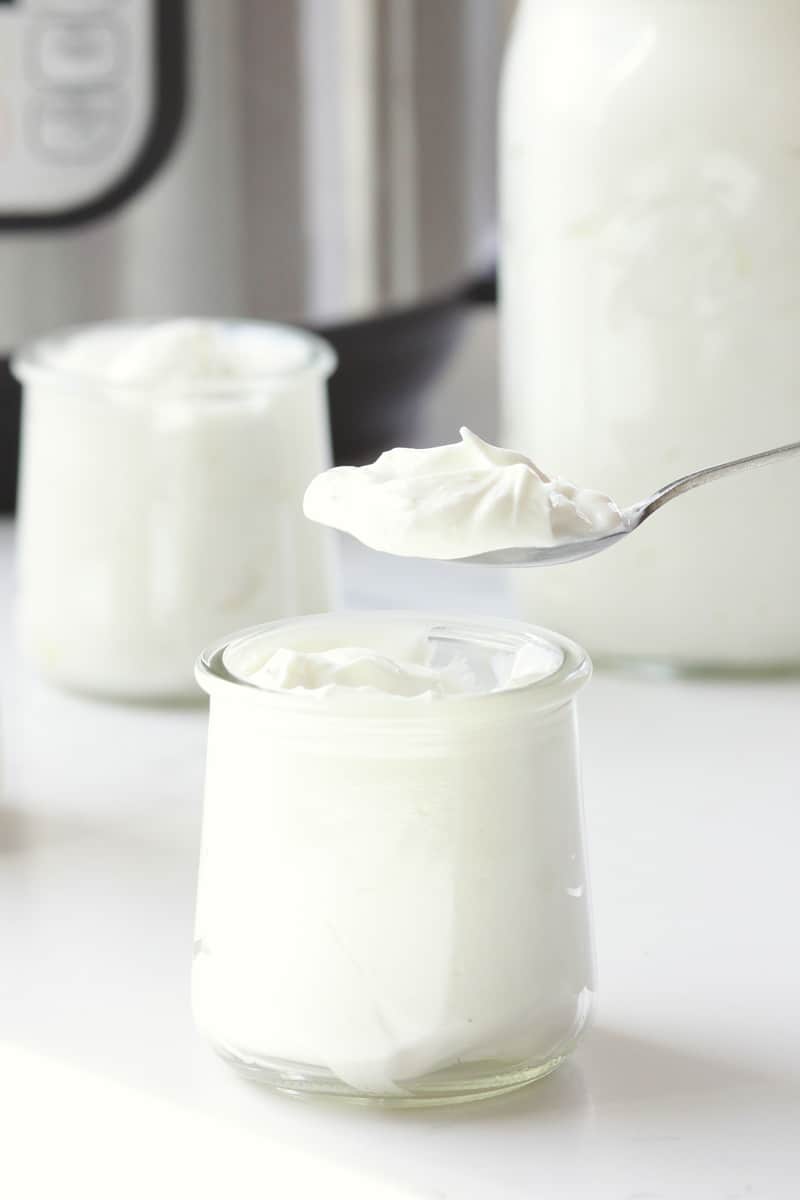
Flavor the Yogurt (optional) – When the consistency is right. Put the yogurt in a bowl and stir in honey and vanilla extract to taste.
Tips For Success
To Serve – Enjoy homemade yogurt the same way you would use store-bought. In smoothies, baked goods, parfaits or just by itself. Add honey and vanilla for a delicious, healthy snack.

To Store – Homemade yogurt can be stored in the fridge for up to 2 weeks.
Substitutions – Any cow’s or even goat’s milk can be used to make instant pot yogurt. I recommend whole fat milk for the creamiest results.
Starter Options – After you make your first pot of yogurt, save 1/2 cup of yogurt to use as the starter for your next batch! Over time, the cultures in the yogurt will weaken, so you’ll have to use store-bought starter when that happens.
Variations – Make different flavored yogurts by stirring in jam or fruit.
why you should make your own yogurt
- It’s absolutely delicious, thick and creamy with a tangy yogurt flavor. Sweeten it with honey or flavor it with vanilla to take it to the next level.
- Homemade yogurt is actually healthier than store-bought that usually contains artificial thickeners, and additives.
- It’s super simple and easy to make and once you make it once, you’ll make it regularly!
- You can make your own yogurt for less than half the cost of the leading brand of store-bought Greek yogurt.
- It only takes 2 simple ingredients: milk and a yogurt starter. That’s it!
FAQ About simple Instant Pot Yogurt
is it worth it to make yogurt in an instant pot?
Definitely! Homemade yogurt is so simple to make using only 2 ingredients. Not to mention it ends up being only a fraction of the cost of store-bought yogurt!
what can you use as a starter for instant pot yogurt?
There are several different kinds of starter you can use to make instant pot yogurt:
- 1/2 cup of store-bought yogurt that contains live and active cultures is the most common starter for making homemade yogurt.
- 1/2 cup of homemade yogurt can be saved from your batch of yogurt to use as a starter next time you want to make yogurt. After awhile the probiotic strains will get weaker and weaker and you will need to buy a fresh starter again.
- premium probiotic powder can also be used as a starter. Make sure it contains these live and active cultures: Lactobacillus bulgaricus, Streprococcus thermophilus, Bifidobacterium lactis or Lactobacillus acidophilus. A quality probiotic powder will require refrigeration.
- leftover whey that was strained form your last batch of homemade yogurt. Don’t throw that yellow liquid away! It’s full of probiotics and can even be used to make another batch of yogurt!
what can you do with leftover whey liquid?
Whey is the yellowish liquid you’re left with after straining homemade yogurt. You might be frustrated with how much whey you get compared to yogurt, but don’t be! Whey is high in vitamin B, calcium and probiotics.
Here are some ways to use whey (pun intended):
- in place of water or milk in baked goods
- in place of buttermilk
- smoothies
- in baked oatmeal recipes
- pancakes and waffles
- in sourdough bread
- as starter for making yogurt
- to make certain cheeses
- in overnight oats recipes
- soak chicken feed in whey
- freeze for later
what kind of milk can you use to make instant pot yogurt
Any kind of cow’s or goat’s milk can be used to make instant pot yogurt. While you can use either whole, 2% or skim milk, whole milk will give you the best results.
The higher the fat content in the milk you use to make yogurt, the sweeter and more consistent texture you will get.
why do you heat the milk before making yogurt?
Heating the milk to 180 degrees F kills any bad bacteria that might be present in the milk. This way only the good bacteria is cultured during the yogurt making process.
Taking this extra step also gives you a creamier, less runny yogurt.
can you use raw milk to make instant pot yogurt?
Raw cow’s or even goat’s milk can be used to make instant pot yogurt. Store-bought milk has undergone a process called pasteurization that is essentially heating it to a temperature of 180 degrees to slow the growth of bacteria and extend it’s shelf life.
While pasteurization does make milk safer to drink, it’s been proven to make it harder to digest.
To maintain all the benefits of using raw milk, it isn’t necessary to heat the milk to 180 degrees like it is with pasteurized milk. Raw milk just needs to be heated to 110 degrees before adding the starter.
why did my instant pot yogurt fail?
There are a few different reasons why your yogurt might not have turned out:
- The milk was not heated high enough. Pasteurized milk needs to be heated to 180 degrees F and raw milk to 110 degrees.
- The milk was cooled down too quickly. Even thought it might be tempting to cut down on the time it takes to make yogurt by cooling the heated milk down in the fridge, doing this will give you a runnier result.
- Not using enough starter.
- The yogurt you used as a starter, did not contain all of the active cultures needed to make yogurt. Make sure your starter contains: Lactobacillus bulgaricus, Streprococcus thermophilus, Bifidobacterium lactis or Lactobacillus acidophilus.
why is my instant pot yogurt so sour?
Yogurt that has been cultured too long on the yogurt setting will taste extra sour since the bacteria in the yogurt starter turns the milk sugars (or lactose) into lactic acid.
The longer you leave the milk at room temperature in the instant pot, the less lactose will be left in it, making your yogurt less sweet and more sour.
More easy Instant Pot Recipes
Pin these steps to try later. Tag @athomeontheprairie on Instagram to share what you’ve made with us!

Simple Instant Pot Yogurt
Making Greek Yogurt in the Instant Pot is one of the easiest ways to add budget friendly probiotics into your family's diet. Just follow these simple steps to end up with an entire gallon of thick and creamy yogurt with only 10 minutes of active prep time!
Ingredients
- 1 gallon of milk (whole milk is recommended)
- 1/2 cup of plain greek yogurt with these 5 Strains of Live Active Cultures (Very Important) L. Bulgaricus, L. Acidophilus, and Bifidus; S. Thermophilus and L. Casei
- optional add ins: honey and vanilla extract
Instructions
- Make sure your instant pot smells clean and free of any smells from the last thing you made in it. Mine can smell like onions sometimes, so I always double check to make sure I won’t be making onion flavored yogurt! Pour milk into the inner pot of your instant pot and hook a thermometer onto the edge of the pot.
- Press the “Sauté” button and let the milk heat until it reaches 180 degrees. Heating the milk kills bacteria that will keep the milk from turning into yogurt.
- Remove the inner pot of the instant pot and let it sit on the counter until the milk has cooled down to room temperature or about 110 degrees. (this step can take a few hours)
- Set the inner pot back into the instant pot and pour in your yogurt culture. Lightly whisk the milk and starter together.
- Remove the rubber gasket from the instant pot lid (to keep any other flavors from affecting the yogurt) and set the lid onto the instant pot. (you could just cover it with plastic wrap instead) No need to make sure it locks.
- Press the yogurt button on the instant pot. Using the arrow buttons, set the time to 9 hours
- When the 9 hours are up and the instant pot beeps, remove the inner lining of the instant pot.
- Set a large colander/strainer over a large bowl. Line the colander with coffee filters or cheesecloth. Pour all of the yogurt into the colander and let most of the excess liquid (whey) strain out so that your yogurt is nice and thick.
- This process can take awhile so it’s best to set the colander and bowl in the fridge. Let the yogurt strain for 12-24 hours until the consistency isn’t runny anymore and it’s looking almost as thick as sour cream or cream cheese.
Notes
To Serve – Enjoy homemade yogurt the same way you would use store-bought. In smoothies, baked goods, parfaits or just by itself. Add honey and vanilla for a delicious, healthy snack.
To Store – Homemade yogurt can be stored in the fridge for up to 2 weeks.
Substitutions – Any cow's or even goat's milk can be used to make instant pot yogurt. I recommend whole milk for the creamiest results.
Starter Options – After you make your first pot of yogurt, save 1/2 cup of yogurt to use as the starter for your next batch! Over time, the cultures in the yogurt will weaken, so you’ll have to use store-bought starter when that happens.
Variations – Make different flavored yogurts by stirring in jam or fruit.
Nutrition Information:
Yield: 16 Serving Size: 1/2 cupAmount Per Serving: Calories: 131Total Fat: 5gSaturated Fat: 3gTrans Fat: 0gUnsaturated Fat: 2gCholesterol: 20mgSodium: 117mgCarbohydrates: 13gFiber: 0gSugar: 14gProtein: 9g


I make homemade Greek yogurt as well! I love it!! (And yep… we do a gallon of milk at a time as well. )
My insta pot doesn’t have the yogurt feature on it, so I just heat mine on the stove top, cool it, add the culture, and the out a lid on the pot and place it in the oven with the light on overnight. The light keeps the oven at just the right temp. ❤️
Your yogurt definitely looks more smooth than mine. I’m curious what makes that difference. We use raw milk from our cow so I’m wondering if that has something to do with it. ♀️ But it’s still so delicious. I’m excited to see more of your adventures. ❤️
Thats so interesting! I’ve never heard of that method but its a great idea!
Beautifully done blog Elizabeth!
You can also use that whey to start other fermented veggies or fruit recipes.
Health is so important these days when childhood chronic illnesses are at an all time high in history. Fermented foods are one of the necessary things for promoting a strong healthy functioning immune system in a cost effective way.
Also another added plus is fermented foods with all their wonderful probiotics, help keep the digestive system working great which in turn helps with weight loss and wt management so for us moms having babies its a great side effect!
Thanks so much Cath!! And yes to the probiotics! Since we’ve been making a lot of fermented foods this Winter we have not been sick! (Knock on wood)
I haven’t tried using whey for fermenting but thats great to know!
I have been making yogurt in the instapot for a long time but I started dieting so tried it with skim milk. I noticed it doesn’t last as long as it did with 2% milk. Do you know why this is? I might have to go back and try it with a 1% milk.
I needed this recipe. My girls love yogurt and this is something that I can totally do myself. Great post!
I love yogurt. Will be trying this. Looks great and you made it look so easy.
I have a goal to make this!! This looks so easy!
I’m just a fan girl here! So happy that your blog is up!!!
Rosy, I cannot wait to see your blog when its up!! Thank you! ❤❤❤❤
Just tried this for the first time and it turned out amazing! I’ve had my instant pot four or five years now and I’ve never made yogurt. I was wondering, can I keep using the homemade yogurt to make more yogurt? What if I don’t want to make it every week?
I’m so glad you gave it a try! And yes! I’ve been meaning to update this post to say you definitely can reuse the homemade Greek yogurt to make more. I usually just make sure to save a 1/2 cup or so each time I make some so that my kids to eat it all haha!
Okay I think you just convinced me to purchase an instant pot! This makes it look so simple! I make homemade yogurt often, but have never tried making greek yogurt.
You won’t regret it! I find new uses for my instant pot every week!
Can you share where to get the cultures? My mom and I have always wanted to make our own yogurt and never realized how easy it was. Thank you for sharing your recipe, can’t wait to try it!
I’m so glad you’re going to give it a try! All you need for the starter is a 1/2 cup of premade yogurt with live and active cultures. Chobani, Fage or the Greek yogurt at Aldi work well!
Just buy a yogurt at the grocery that has active cultures. I used Chobani
I’ve tried a few recipes for Greek yogurt and I have to say this is the easiest to follow. It turned out so yummy! We added a little honey and vanilla and topped it with some homemade granola. I have a feeling I’ll be making yogurt all summer long.
Can you freeze this for later?
You can but the texture will not be the same.
Do you know if it’s possible to use non-dairy milk in this recipe? Like almond milk or something
I have never tried using a non-dairy milk, but I have heard of others trying that! Maybe not in the instant pot though?
How much yogurt does a gallon of milk yield after straining? My kids kept taking it out of the strainer, so I have no idea how much yogurt we actually made! It was amazing!!!! I know I poured off at least a half gallon of whey.
That’s so good to hear you all liked it! It depends on how much your strain the yogurt. I like to get it really thick so we end up with about 1/3 gallon of yogurt.
Can we use raw milk instead of whole milk?
I’ve just updated the post to include instructions about using raw milk.
I’ve never made yogurt before! We’re a family of 6 and yogurt is gone within 2 days! This recipe was simple and easy to follow and I love how you explained every step! It was delicious! Thank you!
That is so good to hear Chelsea! I’m so glad you liked it!
So good and recipe is easy to follow! I only used half a gallon and still had it in the instant pot for 9 hours. Not sour at all, it’s really good by itself.
I’m so glad you like the yogurt, Natalie!
I’ve made your recipe many times. It’s delicious and gets devoured by my family every time. Thanks! The last 3 times I’ve made it, I have quick chilled it in an ice bath, after bringing it to 180°. This takes about 10-15 min, as opposed to several hours on my countertop. Each time, the yogurt has been wonderful, not runny or anything else negative. I realize your tips section says to let it slowly chill, to avoid adverse results. But I’ve not experienced those results. I just wanted to share my findings, as they’ve helped immensely in cutting down the amount of time it takes to make this delicious yogurt. Thank you for sharing your recipe!
Thanks for the recipe! My yogurt is straining now. Excited to try it. I am wondering — should I flavor the entire batch with honey and vanilla right after the straining? Or do you recommend flavoring it as you serve it? And should I save a 1/2 c. of the yogurt unflavored as my starter? Wondering if the honey/vanilla would interfere at all in the yogurt making process if I saved a 1/2 of flavored yogurt instead. Thanks again.
It’s up to you if you want to flavor it all at once since it works well either way, but I would save 1/2 cup of unsweetened yogurt to use as starter next time. I hope you love it!
I did!! Turned out great, loved it. Thanks so much for the instructions. About to make it again and will save some unsweetened starter this time.
Hi, I messed up the time and it’s going to be in the instant pot 13 hours ( unless I want to wake up at 2 am to strain it) Is that ok?
Yes, it’ll e fine! I’ve done that myself, plenty of times
I just started my yogurt. I heated it and I am letting it cool the first time. I didn’t know when to add flavours so I just used one vanilla bean pod, scraped the inside of it and added the pastes and pod in the pot as it cools. I hope I didn’t ruin it. I haven’t added the honey yet.
I’m using raw milk so will heat it to 110. Does this mean I don’t have to really cool it and can just add the yogurt culture right away?
I have the same question. I have been reading through the comments to find the answer to this.
Is it possible to half the recipe? If I use half a gallon of milk? Do I have to have the amount of starter? Also, will the times be the same?
The times will be the same if you half the recipe.
Do I have to half the amount of starter?* If I half the recipe?
You can but adding extra is fine as well.
I tried making yogurt with a different recipe on the stove top but my yogurt came out super runny. It smells like greek yogurt but not sure what went wrong and seeking advice. I, accidentally, used a lite yogurt started, and it cooled faster than I thought and was body temp when I put the started in. Those are the only things that I think could affect it but not sure. It has been in the fridge for a week and all they whey has settled ontop…any advice?
I haven’t made yogurt on the stovetop because it is just so easy in the instant pot, but I would go ahead and try straining the yogurt to make it thicker. Worst case scenario, you can just add it to a smoothie instead of milk.
Is it ok to just drink it as is without straining? Trying to save money on drinkable yogurts for my kiddo and I’m ok with the thinner consistency without straining.
Yes, you totally can! But it is more sour if you don’t strain it so you’ll probably want to sweeten it more.
my instapot has yogurt feature but wont let me set the time. i will see what it is like in 9 hours.
Loved making this! How do you know when your cultures are getting weak? Is there evidence or a recommendation of about how many times? Thank you!
Hi! It takes a good while for the cultures to get pretty weak. I make yogurt once a week and buy a new starter yogurt probably every 3 months. You’ll notice your yogurt not getting as thick and your results will be more watery.
Do you leave it on the counter to strain or put it in the fridge?
I strain it in the fridge because I like to strain mine for a while so that it ends up really thick.
Hi- great recipe! I wanted to know if we can mix in some of the whey that you get from the yogurt that’s getting strained. Would that provide a more smooth texture and loosen up the thickness a bit?
You definitely can. It depends on how thick you like your yogurt
How much whey would you use for a starter?
Do you remove the lid when cooling the milk down to room temperature?
I don’t use the lid at all, just cover with plastic wrap while using the yogurt setting.
I’ve made this recipe twice and love the taste. Both times after a couple days in the fridge, it get small lumps and whey separates. This is after it strained for 12-24 hours. Is this normal? It still taste delicious!
Hi Marie! I don’t have this problem. My guess would be you need to let it go on the yogurt setting a little longer/ Maybe a couple more hours.
Ok so I followed the instructions to a tee. You didn’t say what temp on yogurt setting (low, med, high) so i just left it on low. When the timer was done it was still as thin as when I began. Help!
Oh no! My instant pot just has one yogurt setting, no other options
Can you use half and half instead of milk?
You could but that would be a lot of half and half!
Can you put it in the fridge to make it cool faster?
And then in the 9 hours are up in the middle of the night is it okay to put a longer fermentation or do a keep warm?
Thanks!
Yes you can put it in the fridge! If the 9 hours ends during the night you can definitely extend the ferment time. YOu’ll end up with a more sour, tangy yogurt but it’ll still be good!
Oh my goodness! Now that I have made this, I will never go back to store bought yogurt again! I love this easy process and the yogurt is delicious. The suggestion of the coffee filters is a perfect solution for straining the whey and yogurt. Plus I love now having fresh whey to experiment with in my baking and cooking! Thank you for this recipe!
I’ve been using this recipe for awhile now and I love how the yoghurt turns out, so I was telling my friend about it since she makes yogurt in the instant pot as well and she asked, why I use the sauté when you can use the boil setting that’s also the yogurt button. I told her I didn’t know that theirs one, I checked and did research and the boil setting, once you press the yogurt button a couple of times stops the milk from boiling once it reaches 180!!! Anyways since you mentioned the sauté feature I wondered if you knew about it.
Hi Cindy! I just recently was told about that too!! Thank you for bringing it up because I’ve been meaning to add that information to this post!