How To Make A Homemade Dried Orange Slice Garland


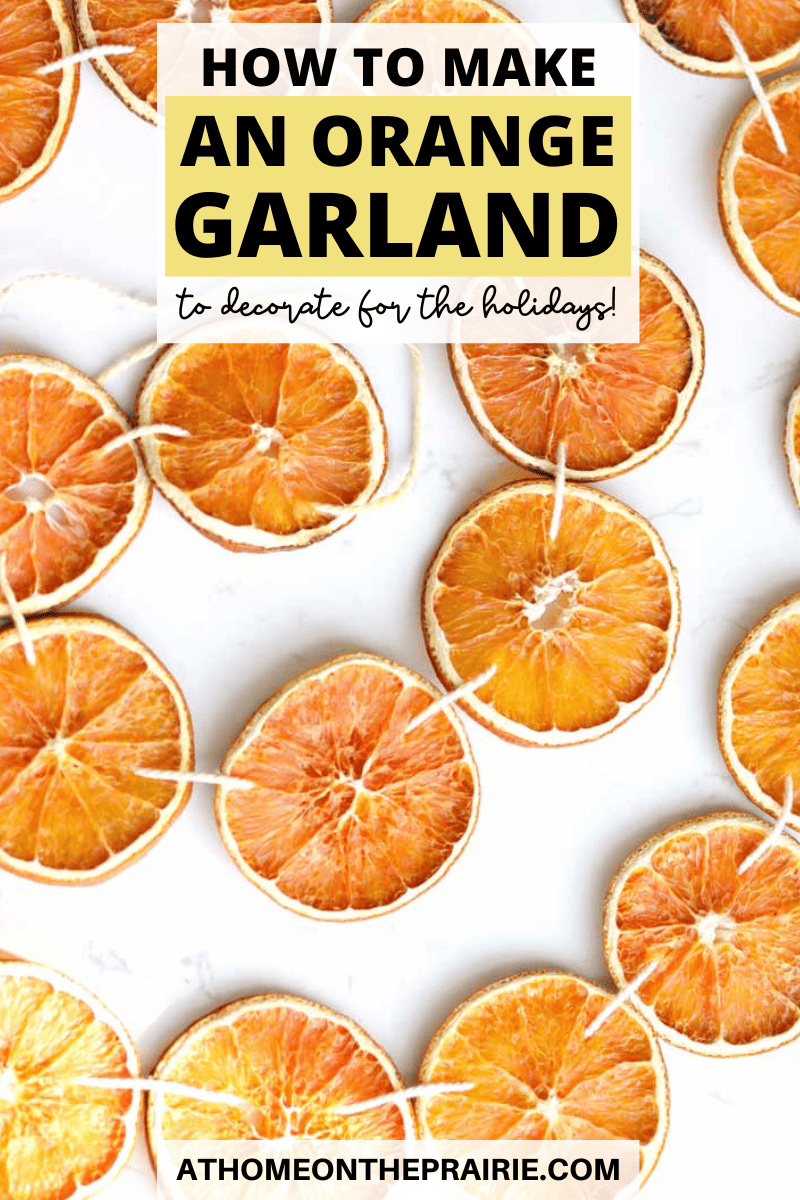

How to make a dried orange garland to use as a simple homemade holiday decoration on your Christmas tree or any space in your home! It’s an easy DIY project that’s so much fun to make each holiday season
I’ve been using dried orange slices in my Winter decor for the last few years. Its a simple way to give my home that “old world” feel for just a couple of dollars!
Since orange is also a color I associate with Fall, I like to make an orange garland in October for a decoration that I can leave up through both seasons!
Dried oranges last a really long time. Years, actually. So you can just save your orange garland to pull out the following year if you want to skip the drying process next time you decorate for the holidays!
Hanging a wooden bead strand with your orange garland gives off fun boho vibes.
What You Need To Make A DIY Dried Orange Garland
supplies
Oranges – Look for oranges that are firm and have as few imperfections as possible. Oranges with thicker peels look prettier dried since the whites of the oranges add a nice contrast between the peel and the pulp.
Cookie Sheets – Because the drying process takes so long, you want to try and fit all of the oranges in the oven at the same time. You can either use one extra large baking sheet or two smaller ones.
Parchment Paper – To bake the sliced oranges on, so that they don’t stick to the cookie sheets. I like to use unbleached parchment paper.
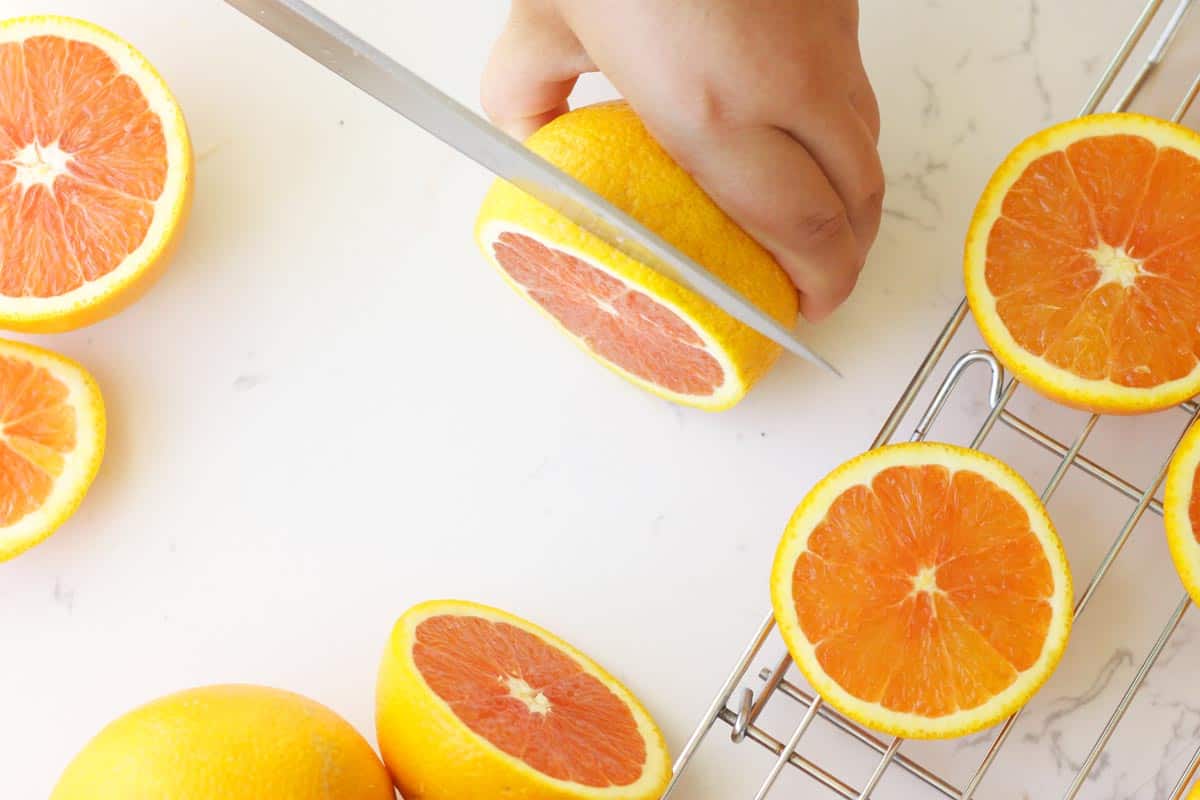
Very Sharp Knife – You need a very sharp long knife to get even slices. If the knife is too dull, the orange will get some juice squeezed out and won’t look as pretty dried. You could use a mandolin slicer if you have one on hand.
Cooling Rack – To make sure the orange slices don’t get too dark in the oven, its best to let them finish drying on cooling racks on the counter.
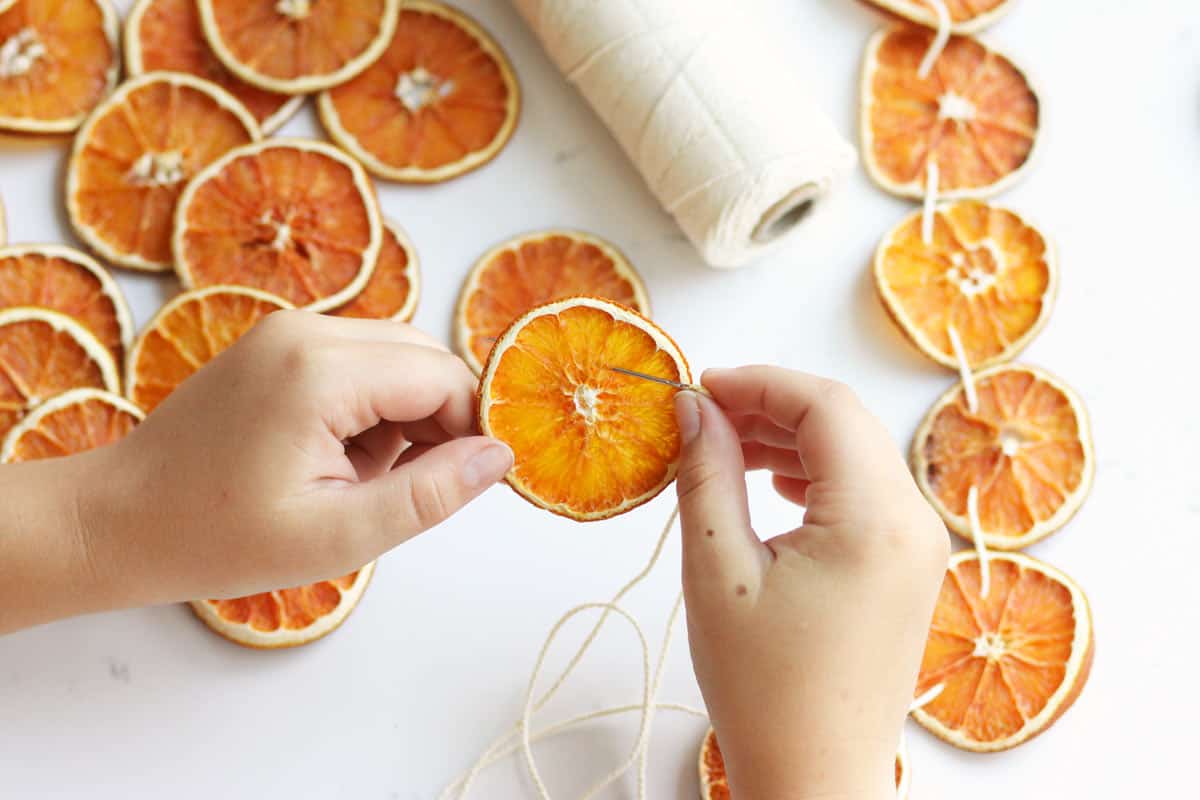
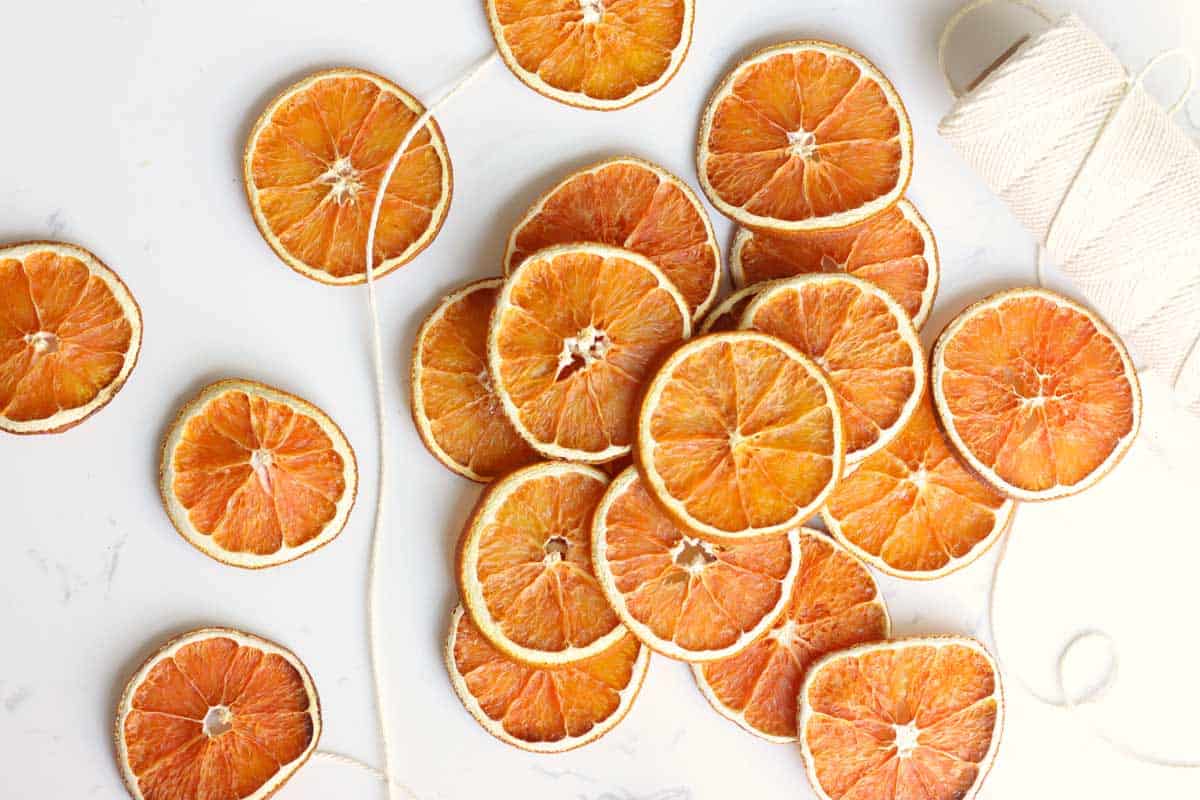
Thread, Twine or String – You can really use any type of string you like. Even ribbon. It’ll depend on the look you’re wanting to achieve. I use a thick twine type of string but I’ve even seen people make dried orange garland with clear fishing line so that it looks like the orange slices are just hanging in air!
Large Needle – A darning or yarn needle is better than a regular sized needle if you’re using twine or string that’s thicker than thread.
how to make a dried orange slice garland
making the dried orange slices:
Prep – Preheat the oven to 250 degrees and position the baking rack to the middle. Line cookie sheets with parchment paper.
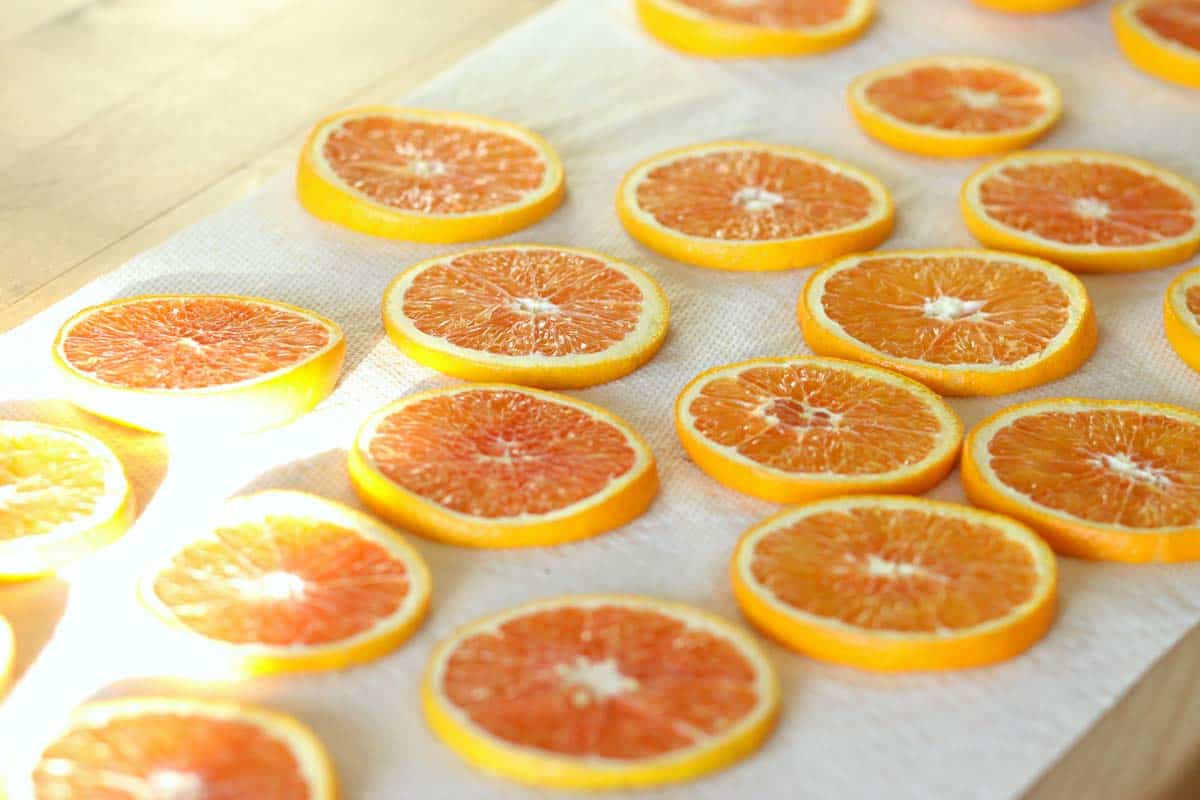
Slice – Carefully slice oranges into 1/4 inch slices with a very sharp knife. Pat the slices very carefully with a paper towel to remove a bit of the moisture. If you have time, let the slices sit on layers of paper towels for a few hours or overnight before they go in the oven to reduce the amount of baking time.
Arrange – Lay the orange slices in a single layer so that they aren’t touching each other.
Bake – Bake the orange slices for 3 hours. Flip them over every hour or so to make sure they dry evenly. If the flesh of the orange is still a bit wet to the touch after 3 hours, let them finish drying on wire baking racks.
making the garland:
Measure and Cut The String – Measure the space you want to hang your orange garland after it’s finished. Add 2-3 feet for drape and finishing the ends.
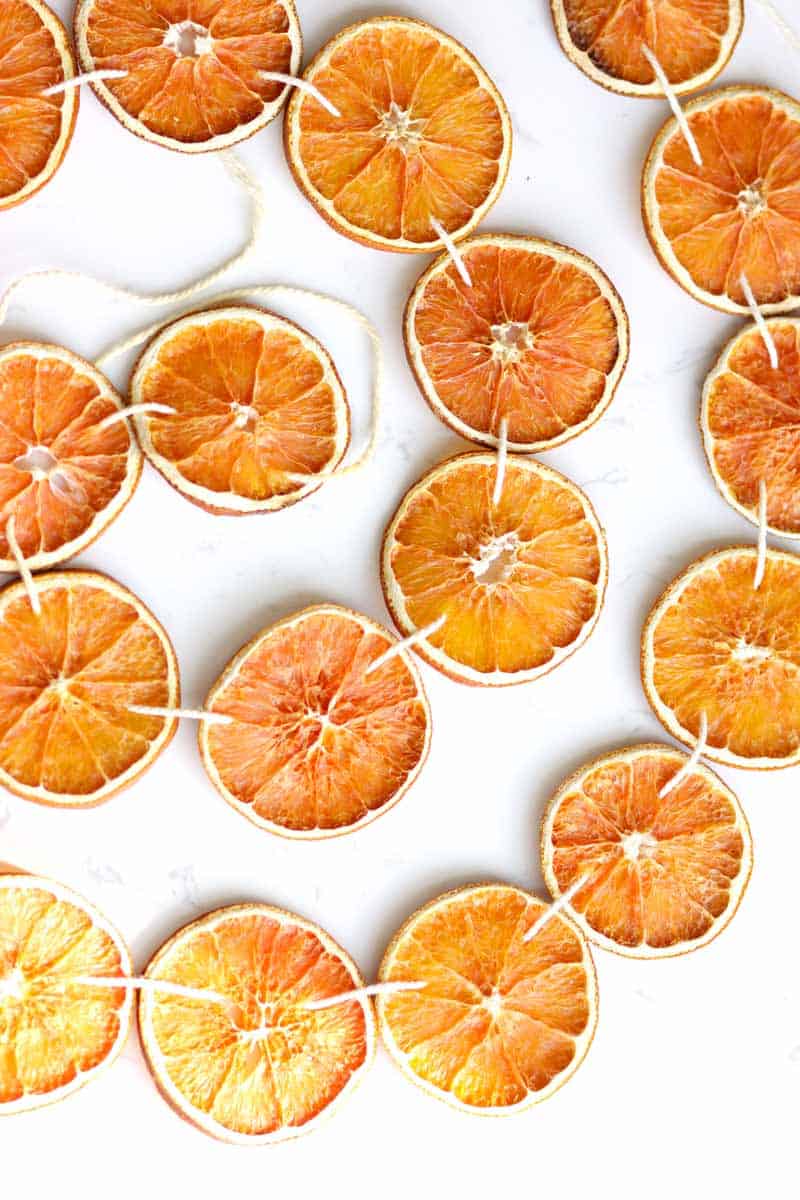
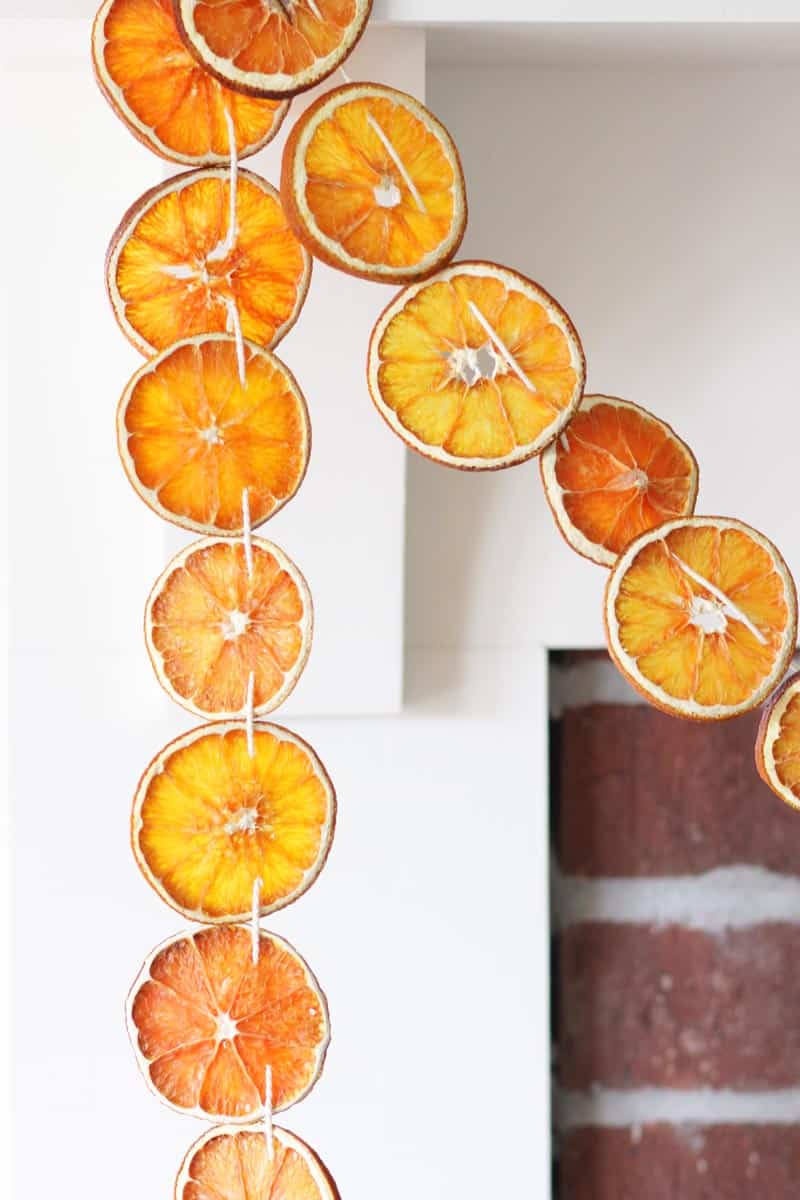
String The Oranges – Pierce each slice through the flesh of the orange and make a stitch by going through the slice again before stringing the next slice. Continue stringing slices as close or as far apart as you want them to be.
Finish The Ends – Once you have your string completely strung, tie the ends and knot them forming a three inch loop.
tips for success
Completely Dried Oranges – Make sure the orange slices are not squishy at all. If they aren’t completely dried out, they will dry on the garland and the holes will expand leaving them gaping and the garland not as pretty.
Store – Never store dried orange slices in an airtight container since they will mold. They can be stored in a bowl, or lidless container for years.
Variations – Other types of citrus besides navel oranges can be used as well. Grapefruits, lemons, limes and blood oranges look beautiful dehydrated. Make your garland out of a combination of different fruit for an extra special and beautiful garland!
FAQ about how to make a dried orange garland
How can I preserve the dried orange slice garland for long-term use?
As long as your orange slices are completely dried out, the garland should last for years to come just stored in a loosely tied grocery bag. The oranges do get darker the longer they sit, but they’re still beautiful!
Dried orange slices shouldn’t be stored in an airtight container because even the smallest bit of moisture can make them mold.
What type of oranges should I use for drying?
Look for oranges that are firm and have as few imperfections as possible. Oranges with thicker peels look prettier dried since the whites of the oranges add a nice contrast between the peel and the pulp.
How many oranges do I need to make a full garland?
You can make a nice long garland with 5 oranges.
How long does it take to dry orange slices for a garland?
Plan on starting the drying process the day before you want to make your citrus garland. The actual amount of time you need for drying oranges depends on how thick you slice them and how juicy they are.
It usually takes 3 hours minimum in the oven plus extra time afterward to air dry them completely. After the slices are dried and ready, you can easily string them together in less than an hour.
What’s the best method to dry orange slices for the garland?
Orange slices can be dried in the oven at 250 degrees for around 3 hours or air dried on racks for several days.
Both of these options will give you great results. The method you choose to dry orange slices will depend on how much time you have available.
Can I use a dehydrator to dry orange slices?
You can dry orange slices in a dehydrator, and the color of the oranges will actually be more vibrant than they will after drying in the oven. Here is a great tutorial for dehydrated oranges.
How can I prevent the orange slices from browning during the drying process?
Drying orange slices on a lower oven temperature for a longer period of time will help keep them from browning as much as they would at a higher temperature.
Using parchment paper underneath the oranges will also keep them from developing browned areas from touching the pan while they dry.
What kind of string or twine should I use to string the orange slices?
Any kind of string can be used to make an orange slice garland. It depends on the look you want.
Twine is most commonly used because it’s thick enough to be plenty sturdy and has enough of a texture to grip the orange slices so they don’t slide around on the garland.
What are some creative ways to display the garland once it’s finished?
For a more minimalist look, you can just hang a simple dried orange garland using a couple of nails or push pins to attach it to walls, window trim or your mantle.
Add a natural element to your Christmas tree by loosely wrapping an orange garland through the branches.
Dress up a simple evergreen garland by draping your orange garland over it.
I like to make a strand of wooden beads to hang on my staircase along with my orange garland!
what can you do with leftover dried orange slices?
Making garlands isn’t the only thing you can use dried citrus slices for! Here are some of my favorite ways to use up extra dried oranges after I finish making my garlands:
- orange ornaments: poke a small hole in the edge of each orange slice and string a 4 inch piece of string through. Tie the ends together. Or just add an ornament hook (that’s what I do). They look beautiful hooked onto an evergreen wreath along with some pine cones.
- stovetop potpourri: put a couple of dried orange slices with a sprig of rosemary, a pinch of cloves and a few cinnamon sticks to simmer in a pot. The perfect way to get in the spirit during Christmas season!
- spiced cider mix: I love to make a jar of hot old fashioned apple cider mix to have on hand to add to cider on chilly days.
- flavored water: add a slice to naturally flavor your ice water.
- in baking: grind them up to use in baked goods.
More Holiday Posts On The Blog:
If you liked this tutorial, I think you’ll really enjoy these other Christmas décor and recipe posts on the blog!
- Homemade Gingerbread Body Lotion
- Homemade Cocoa Mix Without Powdered Milk
- Old Fashioned Hot Apple Cider Recipe
- Homemade Healthy Marshmallows
- DIY Wood Bead Garland
I hope you love this tutorial for making an orange garland! If you make it, I’d love for you to come back and leave a comment and rating so that I know how you like decorating with it!
Pin these steps to try later. Tag @athomeontheprairie on Instagram to share what you’ve made with us!

Dried Orange Garland
How to make a perfect dried orange garland to use as a simple holiday decoration on your Christmas tree or as a beautiful addition to any space in your home! It's an easy DIY project that's so much fun to make every Winter season
Materials
- 5 oranges
- string, twine or thread
Tools
- sharp knife
- cutting board
- paper towels
- cookie sheets
- parchment paper
- cooling racks
Instructions
making the dried orange slices
- Preheat the oven to 200 degrees and position the baking rack to the middle. Line cookie sheets with parchment paper
- Carefully slice oranges into 1/4 inch slices with a very sharp knife. Pat the slices very carefully with a paper towel to remove a bit of the moisture. If you have time, let the slices sit on layers of paper towels for a few hours before they go in the oven to reduce the amount of baking time.
- Lay the orange slices in a single layer so that they aren’t touching each other.
- Bake the orange slices for 3 hours. Flip them over every hour or so to make sure they dry evenly. If the flesh of the orange is still a bit wet to the touch after 3 hours, let them finish drying on wire baking racks.
making the garland
- Measure the space you want to hang your orange garland after it's finished. Add 2-3 feet for drape and finishing the ends.
- Pierce each slice through the flesh of the orange and make a stitch by going through the slice again before stringing the next slice. Continue stringing slices as close or as far apart as you want them to be.
- Once you have your string completely strung, tie the ends and knot them forming a three inch loop.
Notes
Completely Dried Oranges - Make sure the orange slices are not squishy at all. If they aren't completely dried out, they will dry on the garland and the holes will expand leaving them gaping and the garland not as pretty.
Store – Never store dried orange slices in an airtight container since they will mold. They can be stored in a bowl, or lidless container for years.
Variations – Other types of citrus besides navel oranges can be used as well. Grapefruits, lemons, limes and blood oranges look beautiful dehydrated. Make your garland out of a combination of different fruit for an extra special and beautiful garland!
This post contains affiliate links, which means I make a small commission at no extra cost to you. Get my full disclosure here.